In Backstage intro we talked about what kinds of problems Backstage aims to solve and got our first taste of how to launch and play with it. Although we’re now ready to start getting our hands dirty we’ll take a moment to understand the pieces that make Backstage the great piece of software that it is. This will give us a better feel for what’s under the hood and how everything fits together.
What it looks like
The setup we did in Backstage intro hides some of the complexity so that we could get up-and-running quickly. When deployed with the goal of being used by our target users, Backstage will be composed of:
- the core UI
- the UI plugins and their backing services
- databases
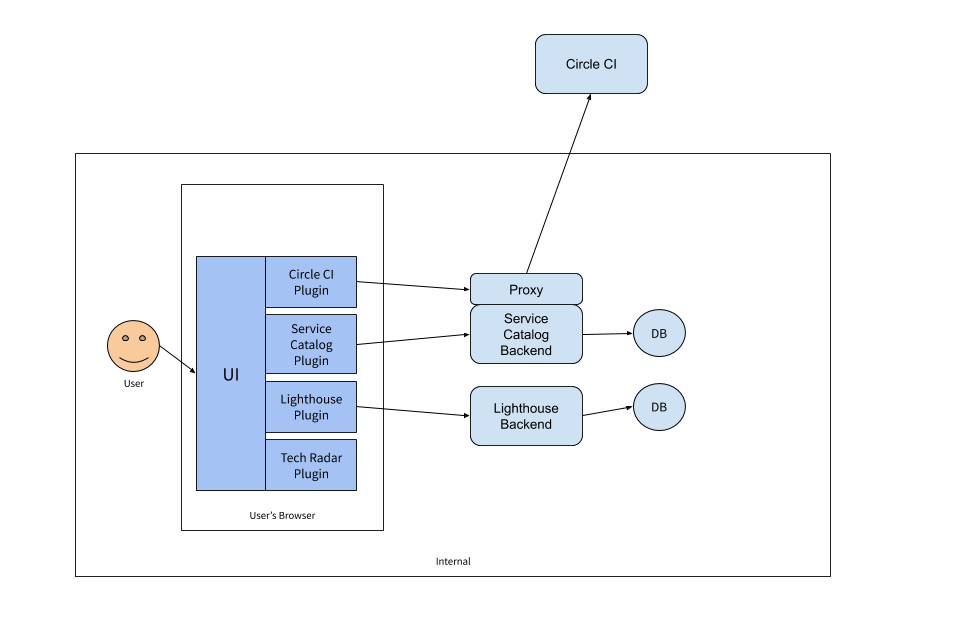
The image below shows an example of a Backstage deployment with a few plugins.

(image source: Backstage official documentation)
The UI depicted above is a client-side wrapper around a set of plugins. It is responsible for providing some core UI components and libraries for shared activities.
Plugins can be of three types:
- standalone - run entirely in the browser
- service backed - make API requests to a service within the Backstage installation
- third-party backed - make API requests to a third-party service (through a proxy)
Each plugin will make itself available on the UI on a dedicated URL since they are client-side applications. Plugins are written in TypeScript or JavaScript and live in their own directory in backstage/plugins. For more information on how to build and integrate plugins check Intro to plugins.
Backstage uses the Knex library which supports a multitude of databases. Despite that, Backstage has been tested to work with SQLite (for testing purposes) and PostgreSQL (for production workloads).
Backstage can also be containerized as well deployed on Kubernetes (you can even use Helm).
This was a quick overview of how Backstage looks under the hood. Next, we will see some of the pieces that make Backstage (even more) valuable.